Share this post
You have a Kubernetes cluster where several developers, CI pipelines, and service accounts all have broad permissions. One misconfigured role or forgotten binding can expose secrets, restart critical workloads, or slow incident response.
Kubernetes RBAC defines who can do what on your cluster resources and enhances team productivity.
This guide explains how RBAC works, highlights common risks, and shows how to implement least-privilege models that keep your cluster secure.
What is Kubernetes RBAC?
Kubernetes RBAC is the authorization layer that decides whether a request against the Kubernetes API succeeds or fails. It answers only one question: who can do what on which Kubernetes resource.
Every API call passes through RBAC after authentication. When a developer runs kubectl get pods, when a controller updates a Deployment, or when a CI pipeline creates a Secret, RBAC evaluates the request. It matches the request’s identity, verb, and resource scope against defined roles. If no rule explicitly allows the action, Kubernetes blocks it.
RBAC does not verify identities; it enforces permissions on already authenticated users and service accounts.
Think of RBAC like this:
Identity ──► Role ──► Allowed actions ──► Kubernetes resource
(already known) (rules) (verbs) (pods, secrets, nodes)
Consequences of Poor RBAC
RBAC mistakes rarely break clusters on day one. The impact compounds as teams, workloads, and automation grow. What starts as convenience-driven access slowly turns into operational risk.
Most production clusters experience at least one of the outcomes below.
Accidental Changes Reach Production Faster
Overly broad permissions make it easy for routine actions to affect critical workloads. A developer intending to inspect logs can restart pods. A CI job meant to update a deployment can delete resources in the same namespace.
For example, a Redditor shared that someone deployed a misconfigured change intended for staging to production at 3 AM, causing pods to crashloop and a two-hour recovery effort.
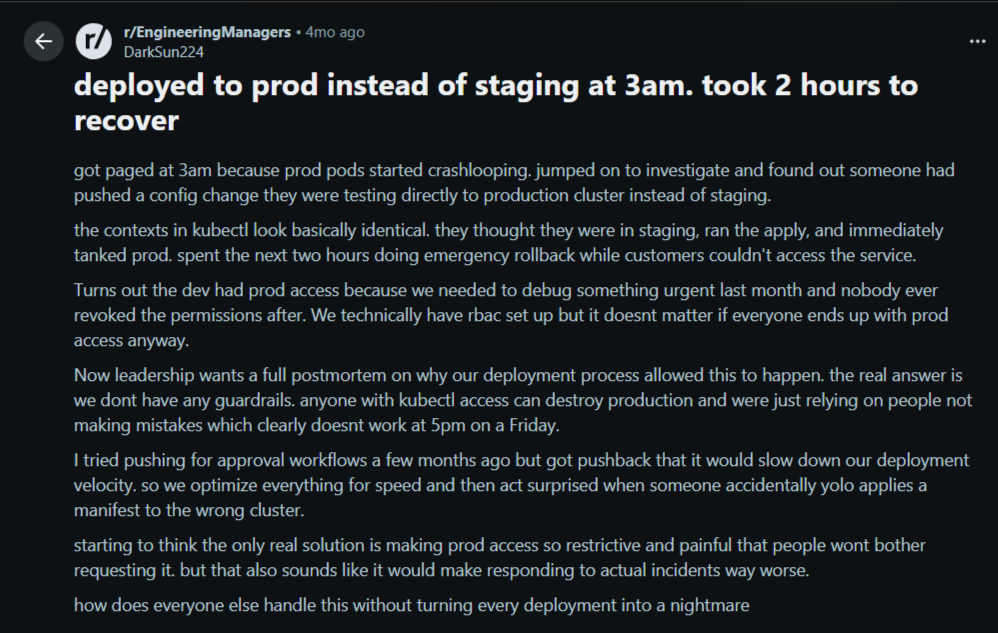
An incident like this results from RBAC rules that grant write access when read access would have sufficed. The result is increased risk of downtime and harder-to-trace production changes.
Secrets and Sensitive Data Become Widely Accessible
When RBAC grants blanket access to namespaces or core resources, Secrets often get exposed to more identities than intended. Build pipelines, support engineers, or third-party tools can read credentials they never need. This issue expands the blast radius of a compromised account.
Remember, Kubernetes does not mask Secrets at the API level; if RBAC allows access, the data becomes fully readable.
Audit and Compliance Efforts Lose Credibility
Clusters with coarse RBAC rules struggle during audits. It becomes difficult to explain why several users or service accounts can modify production resources.
Even if no incident occurs, auditors flag the lack of access boundaries. Many teams then spend time justifying permissions instead of demonstrating control, which becomes even harder without proper shadow IT management in place."
Incident Response Slows Down
During an incident, teams need clarity on who can do what. Poor RBAC obscures that visibility.
When many identities share similar permissions, responders cannot quickly determine which account caused a change or should be revoked. Time is spent on access reviews rather than on recovery, which often increases the duration and impact of outages.
Platform Ownership Becomes Centralized Again
As RBAC complexity grows unmanaged, teams revert to granting cluster-admin access to unblock work. In most cases, platform teams become gatekeepers for routine tasks.
Actions like this reduce self-service goals and increase operational load. Over time, the cluster becomes harder to scale organizationally, even if it scales technically.
{{article-cta}}
How Kubernetes RBAC Works
Kubernetes RBAC does not act alone. It operates inside a larger API request lifecycle that evaluates identity, intent, and scope before any action reaches the cluster.
A Request Reaches the Kubernetes API Server
Every interaction with a cluster starts as an API request. This includes actions triggered by kubectl, CI pipelines, controllers, or platform tools.
The Kubernetes API server receives the request and becomes the single control point for enforcement. Nothing touches the cluster state without passing through this layer. This central role explains why API availability and behavior directly affect cluster reliability and observability, especially in environments that rely heavily on automation and self-service platforms.
Identity Is Already Established
Before RBAC runs, Kubernetes already knows who is making the request. The API server validates the identity using configured authentication mechanisms such as certificates, tokens, or external identity providers.
RBAC does not participate here but receives a confirmed identity. This separation keeps access decisions consistent across workloads, users, and services, regardless of how identity was established.
RBAC always assumes the identity is valid and focuses purely on permission evaluation.
RBAC Matches the Request to Bindings
RBAC now evaluates whether the identity has any associated RoleBindings or ClusterRoleBindings.
These bindings connect the identity to one or more roles. If no binding exists, evaluation stops, and Kubernetes denies the request. This is where access boundaries form.
Namespace-scoped bindings limit impact, while cluster-wide bindings expand reach. At scale, this stage determines whether access remains predictable or quietly spreads across your environments.
Roles Expand into Allowed Actions
Once bindings resolve, Kubernetes expands the linked roles into explicit permissions. Each role defines the allowed verbs (such as read or modify), the resource types involved, and the applicable scope.
Kubernetes compares these rules against the incoming request, and the evaluation stays strict. Partial matches do not count; even if one required permission is missing, the request fails.
This precision explains why RBAC is safe by default but becomes risky when roles become too broad.
Kubernetes Allows or Rejects the Request
Kubernetes makes a final decision. If at least one rule explicitly allows the request, it proceeds. Otherwise, the API server rejects it immediately.
No fallback exists. No implicit permissions apply. This deterministic outcome supports strong auditing and monitoring, which becomes crucial in production environments with many actors and automated workflows.
Clear allow-or-deny outcomes also simplify operational visibility when paired with proper Kubernetes monitoring and access reviews.
Now, let’s see what makes up a Kubernetes RBAC.
Core Kubernetes RBAC Components
Kubernetes RBAC works through a small set of components that operate together to evaluate access. Each defines a specific part of the permission model, but none provides value in isolation.
Subjects
Subjects represent who is requesting access. Kubernetes recognizes users, groups, and service accounts as subjects.
{{article-pro-tip}}
Roles
Roles define the actions allowed. They describe which operations an identity may perform and on which resource types.
Namespace-scoped roles limit permissions to a single namespace. This scoping helps reduce blast radius while still enabling your team to manage their own workloads without central intervention.
ClusterRoles
ClusterRoles extend the same permission model beyond a single namespace. They apply to cluster-wide resources and shared control-plane objects.
Platform teams use them to grant access to nodes, persistent volumes, or non-namespaced APIs. This happens because ClusterRoles carry a broader impact; small expansions here often lead to large permission surfaces.
RoleBindings
RoleBindings connect subjects to roles within a namespace. They form the enforcement layer of RBAC by turning abstract permissions into effective access.
A role without a binding does nothing. RoleBindings allow your team to reuse roles across environments while maintaining strict namespace boundaries.
ClusterRoleBindings
ClusterRoleBindings associate subjects with ClusterRoles across the entire cluster. They enable shared services, operators, and platform tooling to function consistently. At the same time, they represent the most common source of over-permissioning.
Each ClusterRoleBinding deserves careful review because it bypasses namespace isolation by design.
Further reading: Kubernetes Multi-Cluster Management
Kubernetes RBAC Best Practices
These practices help you maintain control as your clusters scale, while still allowing your developers and automation to move quickly.
Design Permissions Around Real Workflows
RBAC works best when permissions reflect how work actually happens. Group access around tasks such as deploying workloads, observing applications, or managing infrastructure.
This approach avoids roles that mix unrelated actions. As workflows evolve, permissions stay easier to reason about and adjust. Most importantly, your team will spend less time requesting exceptions because access already matches responsibility boundaries.
Keep Write Access Narrow and Intentional
Read access scales safely. Write access does not. Limit create, update, and delete permissions to identities that actively operate resources. This reduces the chance of accidental changes reaching production.
It also improves accountability during reviews and incidents. When write access stays rare and well understood, clusters remain more predictable under pressure.
Prefer Namespace Isolation Over Global Access
Namespaces provide a natural boundary for RBAC enforcement. Use them to separate teams, environments, or workloads with different risk profiles.
Namespace-scoped roles allow autonomy without exposing the broader cluster. Global permissions should remain the exception. This model scales cleanly across multi-team and multi-cluster environments without increasing operational overhead.
Treat Service Accounts as Production Identities
Service accounts often outlive users and power automation. Their permissions deserve the same scrutiny as human access. Scope them tightly and review them regularly.
Shruthi Chikkela shared that a service account created months ago for a temporary integration test in a fintech company she worked with was attacked due to a vulnerability in the service’s code.
She said, “The service account was bound to a ClusterRole to allow access across namespaces just for testing.
The ticket was closed; no one removed the permission, and over time, the same service account became part of a live payment-processing workflow. One day, a vulnerability in the service’s code allowed an attacker to exploit that service account.”
Over time, unused or overly broad service accounts become silent risk multipliers. Managing them deliberately keeps automation reliable and limits the impact of credential leaks
Review Access as the Cluster Changes
New teams, tools, and controllers change access patterns. That’s why periodic reviews help you catch permission drift before it becomes normal.
These reviews do not need to be heavy processes. Even lightweight, recurring checks improve confidence and reduce long-term security debt.
Empower Your Team with Scalable, Controlled Kubernetes RBAC
In real Kubernetes environments, your team needs to understand who has access, why that access exists, and where it applies without interrupting delivery. Portainer supports this by making RBAC enforcement visible and consistent across clusters, while still relying on native Kubernetes authorization under the hood.
This approach works best for organizations running shared clusters, multi-cluster environments, or regulated workloads where access clarity matters. Smaller teams with minimal access complexity may prefer native tooling, but RBAC risk grows quickly at scale.
If RBAC friction already slows your teams, the next step is to create control with clarity. Book a Portainer demo to see how Kubernetes RBAC operates at scale in real production platforms.
{{article-cta}}
FAQs
1. How do you handle Kubernetes RBAC at scale, especially with dozens of teams and namespaces?
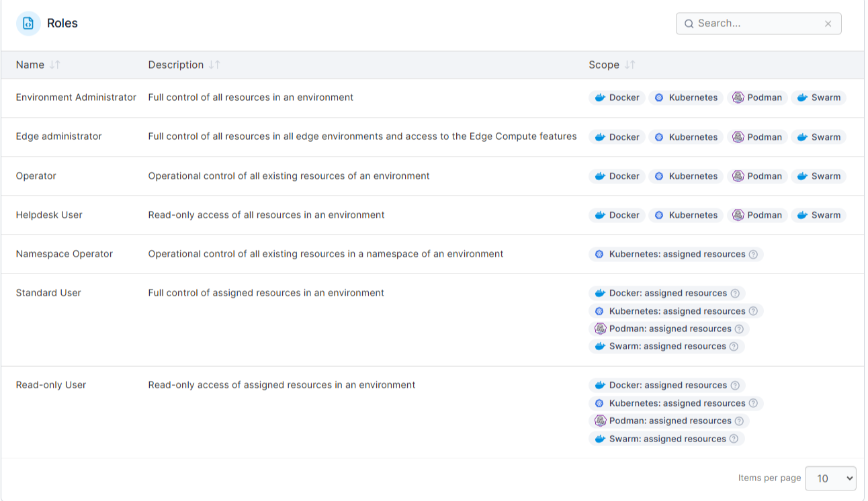
Design permissions around workflows rather than individual users, keep write access narrow, and use namespaces as the primary boundary. At scale, native Kubernetes RBAC becomes hard to reason about because verbs, roles, and bindings multiply across namespaces and clusters. Portainer orchestrates Kubernetes RBAC through pre-defined roles that map to real job functions like namespace operator or helpdesk, so permissions stay consistent across every cluster without hand-writing ClusterRole manifests for each team.
2. How do you set up Kubernetes multi-tenancy for multiple teams or departments without constant conflict?
Use namespaces as the primary tenant boundary, apply resource quotas per namespace to prevent one team from starving others, and scope RBAC roles to specific namespaces so teams manage their own workloads without touching each other’s. Add network policies to prevent cross-namespace traffic where isolation matters. Portainer applies this pattern across every cluster with visual namespace management, per-namespace resource quotas, and RBAC roles scoped to specific namespaces or teams.
3. How do I give developers the ability to deploy to Kubernetes without me being the bottleneck for every release?
Design RBAC around workflows so developers have write access scoped to their own namespaces, then apply the least-privilege model consistently across clusters. Without clear namespace boundaries, platform teams end up granting cluster-admin as the fastest way to unblock work, which reverses the self-service goal. Portainer’s visual RBAC assigns roles to users and teams through a point-and-click interface, so developers get the access they need without granting broader permissions than necessary.
4. How do you integrate Active Directory or Okta with Kubernetes RBAC?
Kubernetes doesn’t authenticate users itself. It relies on external identity providers like LDAP, Active Directory, or OIDC-compatible services like Okta for authentication, then applies RBAC to the authenticated identity. The common pattern is to map corporate groups to Kubernetes groups, then bind RBAC roles to those groups so access follows people’s actual team membership. Portainer supports LDAP, Active Directory, and OIDC providers directly, so users authenticate with corporate credentials and inherit their team’s RBAC scope automatically.