


In this guest blog post from James Reynolds, he delves into using Fedora CoreOS, Portainer, and WordPress in 7 Easy Steps. The magic of Fedora CoreOS is that it configures itself at install time, including installing Portainer and enabling the host firewall. Once configured, you can quickly and repeatedly set up this server without logging into it. Then you can use Portainer to run any container or docker-compose file like WordPress. By firewalling Portainer you protect your admin interface from possible attacks while leaving the services rendered by your other containers accessible.
![]()
You need somewhere to install Fedora CoreOS, either bare metal hardware or a virtual environment, which could include the cloud. Before deploying, you'll want to perfect your configuration and it's easiest to do that in a test environment. So I'll show how to install it on your own computer using VirtualBox, which is free to download. This is essentially the same thing as installing on a bare metal server.
The FCOS documentation includes examples showing how you would create a FCOS instance on AWS and locally on a Linux computer using libvert. The documentation has provisioning instructions for Alibaba Cloud, AWS, Azure, DigitalOcean, Exoscale, GCP, IBM Cloud, libvirt, OpenStack, QEMU, VMware, and Vultr. Please see the documentation for more information on the provisioning method of your choice.
To follow along, you will need VirtualBox, Docker, a text editor, and a local web server to host a config file. I'll use a simple Python 3 command. If you need to install Python 3, please do a web search on how to install Python 3. I'm doing this on macOS but there is nothing platform specific.
I'll refer to 2 host names, host.example.com and fcos.example.com. Your computer running VirtualBox is host.example.com. Your VM running FCOS is fcos.example.com. Change these names to the IP's of each before running any commands.
If you're already familiar with Fedora CoreOS, Butane (formerly the Fedora CoreOS Config Transpiler, FCCT), Ignition files, and provisioning, go ahead and skip to Step 5. Add Portainer, Step 6. Add WordPress, or Step 7. Add a Host Firewall. If you're new to Fedora CoreOS, Butane, and Ignition, keep reading.
Motivation
Portainer is lightweight, simple to deploy, and makes it easy to use containers. Portainer CE is open source and runs in a container itself, so installing it is a docker command and uninstalling it is as simple as removing the container. It works with Kubernetes, Docker, Docker Swarm and Azure ACI.
Portainer is powerful. It can control all of my containers. Before I was willing to put it on a production server I needed to firewall the Portainer port so that the login page can't be accessed from non-approved IPs. I don't control the network firewall that my server will be running on so I need to configure this firewall on the host. Unfortunately, at this time the FCOS documentation doesn't explain how to setup a host firewall. It took searching and trial and error to figure it all out.
Also, FCOS does not come with docker-compose. Adding WordPress is my way of showing how Portainer enables you to use docker-compose files with FCOS without having to install docker-compose in the OS.
About Fedora CoreOS
Fedora CoreOS is a secure, minimal, production-ready container operating system that aims to be one of the best platforms for both cloud computing clusters and single node deployments. It is optimized for Kubernetes and for stand alone operations.
FCOS is an immutable operating system that automatically updates itself. Although you can install software into FCOS using rpm-ostree, the documentation strongly discourages doing so because automatic updates may have difficulty with extra packages installed. If you are interested in doing this, there is a good article on the Red Hat developer's blog that discusses rpm-ostree.
FCOS is customized when it's installed by an Ignition config file. Ignition can re-partition disks, format filesystems, create users, and write files, including systemd services. Most of the work to setup FCOS is making your Ignition configuration file and making sure the provisioning method can read it at install time.
Being immutable just means everything is read-only. However, the directories /etc and /var are mounted as read-write which lets users write and modify files there. But all of those changes should be considered ephemeral, that is, disposable. Your long-term infrastructure should be encapsulated in your Ignition config file and your containers.
After going through all the steps below, you might need to login to FCOS and edit configuration files until it is setup for your environment. If you do that, you'll need to use vi since there are no other text editors installed in FCOS. If you've never used vi before you'll need to search the web for instructions on how to use it.
Once you have figured out everything you want, you'll want to save all of those changes to the Ignition file, throw away your install, then start over. This is why it's good to do this virtually on your own computer first before installing for production. Once you have your Ignition file you can recreate your entire server from scratch without having to login, which is the goal.
On a production server you need a persistent storage method. You could configure your containers to store their data in the cloud, or you could save to disk. This is a big enough topic that depends so much on your environment that I can't cover it here. The FCOS documentation has a page devoted to storage. My examples will be storing the container data in the default location, /var/lib/docker/containers. If you do the same thing, you need to move the container data off of the server before starting over if you want to save it.
I mentioned earlier that FCOS does not include docker-compose. You can install it by running sudo rpm-ostree install docker-compose, but as I've said, the official documentation discourages installing anything outside of containers. Portainer's stacks accept docker-compose files. This makes Portainer a great addition to FCOS.
FCOS includes both docker and podman. The Portainer developers are aiming to add podman support in the second half of 2021. For this reason, I will only cover setting up FCOS with docker.
Step 1. Butane Configuration
The first step is to create a Butane file. Butane config files are formatted as YAML. We will convert this to an Ignition file in step 2. The goal of the Butane/Ignition config file is to set up the server when FCOS installs. That way you don't have to login to the server after you install it.
However, when starting out, it's a good idea to login and look around. You can login by either setting up ssh or setting a login password.
Set Up ssh
Here is a basic Butane file that enables ssh login.
variant: fcos
version: 1.3.0
passwd:
  users:
    - name: core
      ssh_authorized_keys:
        - ssh-rsa AAAAB3NzaC1yc...
Replace the ssh-rsa portion with your public key file. If you don't have one and don't know how to get one, search the web for "create ssh public key".
Note, the big advantage of ssh is that you can copy and paste commands. If you interact with FCOS using VirtualBox's window, you can't copy and paste commands.
Set a Password
The core user can run sudo without asking for a password, so you don't have to set a password. But in case you want a password, just add "password_hash" to your Ignition file.
passwd:
  users:
    - name: core
      password_hash: $y$j9T$kWrG97KL0ouB3d3VdtBrA.$10OyjrSU7C5tlnHcNxaQD531aFTq4/gNwFovW5Yp/90
There are a few ways you can get a password hash. The Fedora CoreOS documentation recommends you use the mkpassword command and specify the yescrypt hash. Windows users can use the Cygwin mkpasswd utility. On Linux or macOS you can even run it in a container.
Note, I'm pretty sure there are containers on Docker Hub with this pre-installed but I made a rule for myself that I don't use unofficial images.
docker run --rm -it fedora
Then, inside of the container, run this.
dnf -y install mkpasswd ; mkpasswd --method=yescrypt
It will take a minute to install and then it will ask for a password. Enter the password you want. It will print the password hash. Copy it and use it in the Butane file.
If you want to login to ssh using a password, you have to configure that also.
storage:
  files:
    - path: /etc/ssh/sshd_config.d/20-enable-passwords.conf
      mode: 0644
      contents:
        inline: |
          # Fedora CoreOS disables SSH password login by default.
          # Enable it.
          # This file must sort before 40-disable-passwords.conf.
          PasswordAuthentication yes
Silence Console Messages
This code silences many console messages that print out while logged into FCOS and is optional.
storage:
  files:
    - path: /etc/profile.d/systemd-pager.sh
      mode: 0644
      contents:
        inline: |
          # Tell systemd to not use a pager when printing information
          export SYSTEMD_PAGER=cat
    - path: /etc/sysctl.d/20-silence-audit.conf
      mode: 0644
      contents:
        inline: |
          # Raise console message logging level from DEBUG (7) to WARNING (4)
          # to hide audit messages from the interactive console
          kernel.printk=4
Set the hostname
Setting a hostname makes it easier to tell one server from another when you end up having a dozen or so of these VM's booted up.
storage:
  files:
    - path: /etc/hostname
      mode: 0644
      contents:
        inline: |
          1-basic
All of the Above
If you add all of the options above this is what your Butane file will look like. Remember, you only need one way to login, and ssh is probably the best way to go for a production server.
Don't forget to put in your own ssh-rsa key and password hash.
variant: fcos
version: 1.3.0
passwd:
  users:
    - name: core
      ssh_authorized_keys:
        - ssh-rsa AAAAB3NzaC1yc...
      password_hash: $y$j9T$kWrG97KL0ouB3d3VdtBrA.$10OyjrSU7C5tlnHcNxaQD531aFTq4/gNwFovW5Yp/90
storage:
  files:
    - path: /etc/ssh/sshd_config.d/20-enable-passwords.conf
      mode: 0644
      contents:
        inline: |
          # Fedora CoreOS disables SSH password login by default.
          # Enable it.
          # This file must sort before 40-disable-passwords.conf.
          PasswordAuthentication yes
    - path: /etc/profile.d/systemd-pager.sh
      mode: 0644
      contents:
        inline: |
          # Tell systemd to not use a pager when printing information
          export SYSTEMD_PAGER=cat
    - path: /etc/sysctl.d/20-silence-audit.conf
      mode: 0644
      contents:
        inline: |
          # Raise console message logging level from DEBUG (7) to WARNING (4)
          # to hide audit messages from the interactive console
          kernel.printk=4
    - path: /etc/hostname
      mode: 0644
      contents:
        inline: |
          1-basic
You can see the full Butane file on GitHub.
Step 2. Convert Butane to Ignition
The butane command line tool (formerly the Fedora CoreOS Config Transpiler, FCCT) converts Butane files into Ignition files. Ignition files are formatted as JSON and are not meant to be edited by hand.
Run the following command to convert the Butane file to an Ignition file.
docker run -i --rm quay.io/coreos/butane:release --strict < 1_basic.bu > 1_basic.ign
The converted file should look something like this.
{"ignition":{"config":{"replace":{"source":null,"verification":{}}},"security":{"tls":{}},"timeouts":{},"version":"3.0.0"},"passwd":{"users":[{"name":"core","sshAuthorizedKeys":["ssh-rsa ssh-rsa AAAAB3NzaC1yc..."]}]},"storage":{},"systemd":{}}
Step 3. Create the VM in VirtualBox
Now let's create a VM in VirtualBox and connect it up to our Ignition file. The hardware requirements for FCOS is 2 CPU's, 4096 MB of RAM, and 8 GB of hard disk.
First download the fedora-coreos Bare Metal ISO from the web or you can use this command to download the ISO.
docker run --privileged --pull=always --rm -v $PWD:/data -w /data \
quay.io/coreos/coreos-installer:release download -s stable -p metal -f iso
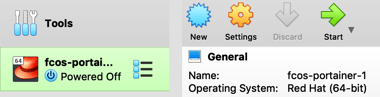
Open VirtualBox and click the "New" button.
Name your virtual machine something like "fcos-portainer-1", set the type to "Linux" and version to "Red Hat (64-bit)". Give it 4096 MB of RAM. Make sure "Create a virtual hard disk now" is selected and then click "Create".
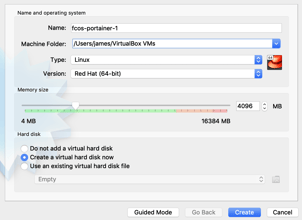
Next, set the hard disk size to 9 GB. 8 GB is the recommended minimum but I got warnings it wasn't big enough so I use 9 GB. Choose the VDI and Dynamically allocated. Any type will work, but Dynamically allocated VDI uses little hard disk space. Click "Create".

Once the virtual machine is created, click the "Settings" button.
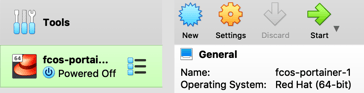
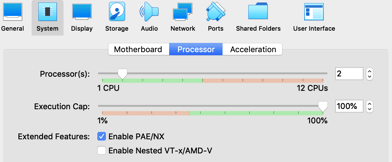
2 CPU's
In Settings, click on "System", then the "Processor" tab and set CPU to 2.
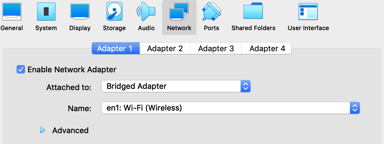
Set Up Networking
Your environment will dictate what you do here. Your VM needs to be able to talk to the host computer (to download the Ignition file) and to the internet (to download Portainer). If you have a DHCP server on your network you can use Bridged Networking.
In Settings, click "Network", and then set "Attached to" to "Bridged Adapter". Then click "Ok".
Set the virtual optical disk file at first boot
Click the "Start" button.
The first time you start a VM VirtualBox asks you to set the virtual optical disk.
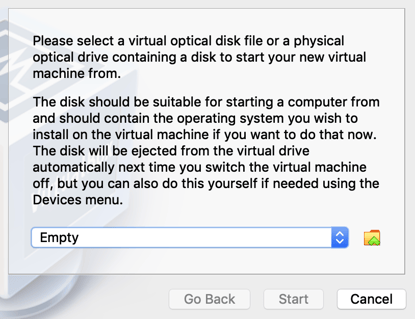
Click the folder icon and then click the "Add" button. Find and select the Fedora CoreOS iso you downloaded earlier. Then click "Start".
Manually set the virtual optical disk file
This is how you manually set the virtual optical disk file (e.g. you clicked cancel instead of setting a optical disk file).
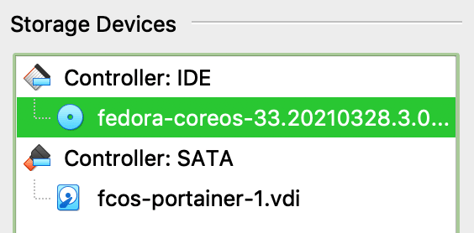
In Settings, click "Storage". Click on "Empty" under "Controller: IDE". On the right in the "Attributes" section, click the blue disk icon next to "IDE Secondary Device 0".
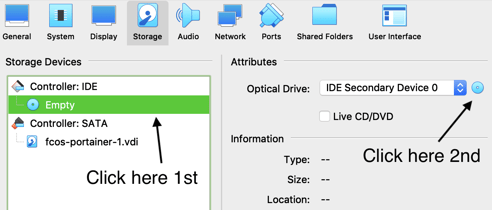
In the pop-up select "Choose a disk file..." then find and select the iso you downloaded earlier. It should look like this.
Click "OK".
Start Fedora CoreOS
Click the "Start" button to start up the VM if you haven't already.
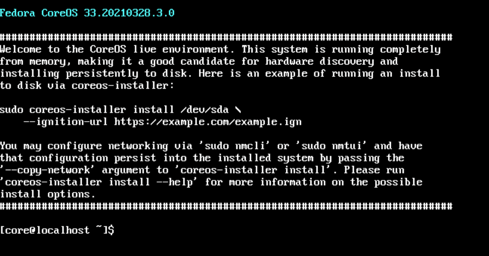
When the VM boots from the ISO it will auto login as the core user and you'll have a terminal prompt. Nothing is installed yet. This is what it looks like when it boots to the live installer.
If you've never used VirtualBox before you should know a few things. The VM window will "capture" your mouse. That means you wont be able to move your mouse out of the window until you press the "Host" key, which on the Mac is usually the left command key.
Another thing about Macs with retina displays is that the window will be small. You can make it bigger by selecting "Scaled-Mode" in the "View" menu.
Set the FCOS IP
If you don't have DHCP, you'll have to set a static IP on the VM. You'll need the VM network interface.
nmcli connection
You should see something like this.
Wired connection 1 df07b92a-4319-3ae7-8ebd-3920b2ac15b3 ethernet enp0s3
The correct interface for this output is enp0s3. Yours may be different depending on how you configured the networking.
Change the interface and the IP in the following like to match what will work on your subnet.
sudo ip addr add 192.168.0.200/24 dev enp0s3
This IP will only last while booted to the Live CD. To change it permanently check out the FCOS network documentation. You can set the networking at the install step, you can set it with the ignition file, or you can set it with other methods.
Step 4. Download the Ignition Config and Install
Host the Ignition File on a Web Server
Now you need to set up a web server with your Ignition file. It's easy to do this if you have Python3 installed. If you don't have it installed, you can run it in Docker. On your host computer, in the Terminal, cd to the directory that contains your Ignition file. If you have Python3 installed run the following command. It will print feedback when it's running.
python3 -m http.server
To run Python3 with Docker, type the following command.
docker run -p 8000:8000 -v $PWD:/data -it --rm python
Then type these commands in the container. Note, you wont get feedback after the last line.
import os
os.chdir("/data")
from http.server import HTTPServer, SimpleHTTPRequestHandler
HTTPServer(('', 8000), SimpleHTTPRequestHandler).serve_forever()
By default the web server is running on port 8000. You should also find the IP of your host computer. The Ignition file URL will be something like host.example.com:8000/1_basic.ign. Change "host.example.com" to your host computer IP.
Download the Ignition File
On the VM download the Ignition file.
curl -O host.example.com:8000/1_basic.ign
You should verify it downloaded by typing the following.
cat 1_basic.ign
After it's downloaded, quit the Python web server. Press cntl-c in the host Terminal window running the Python web server. If you ran the web server with Docker you'll need to press cntl-d or type "exit()" to quit.
Install Fedora CoreOS
Now install Fedora CoreOS. Type this in to the VM console. Change "1_basic.ign" to the name of the file you downloaded.
sudo coreos-installer install /dev/sda --ignition-file 1_basic.ign
If you have any trouble installing, please read the [Installing CoreOS on Bare Metal] (https://docs.fedoraproject.org/en-US/fedora-coreos/bare-metal/).
After it's installed, you'll see the text "Install complete." Turn off the VM with the following command.
poweroff
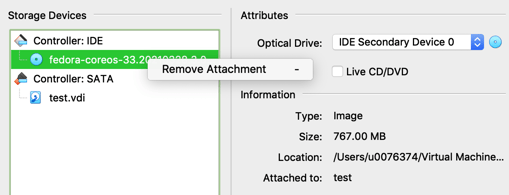
The VM will boot to the installer until you remove the live CD. Go back into "Settings", "Storage", and right-click on "fedora-coreos" and select "Remove Attachment". Click "Remove" in the confirmation dialog, and then click "OK".
Login and Test
Start up the VM again. Now you get to see if the login methods you configured work. If you set a password then login to the console with the username "core" and the password you created with the mkpasswd command. If you set up ssh, FCOS will display the IP immediately after it boots on the console. Remotely connect using ssh core@fcos.example.com (change fcos.example.com to your VM IP).
Once you're logged in, try starting a container.
sudo docker run hello-world
Now check to see if you can run a web server from your VM.
sudo docker run -d -p 80:80 docker/getting-started
On your host, see if you can connect to the VM's container with a web browser.
Hopefully you see the Docker "Getting Started" webpage. If not, check to see if the container is running on the VM by typing docker ps. Also check to make sure you are using the correct IP by typing ip a in the VM.
Note, by default the core user isn't in the docker group, but you can add it to the Butane file like so.
variant: fcos
version: 1.3.0
passwd:
  users:
    - name: core
      groups:
        - docker
Step 5. Add Portainer
Manually
Installing Portainer is easy. To install it with Docker, run these 2 commands.
sudo docker volume create portainer_data
sudo docker run --privileged=true -d -p 8000:8000 -p 9000:9000 --name=portainer --restart=always -v /var/run/docker.sock:/var/run/docker.sock -v portainer_data:/data portainer/portainer-ce
On your host you should be able to open up a web browser to http://fcos.example.com:9000/ (change fcos.example.com to your VM IP). You'll see the Portainer initialization page. For more information on setting up Portainer check out the quick start documentation. Or you can just wing it. You can just delete the container and volume and start over if you mess it up.

At First Boot
Now, to add Portainer to our Ignition file. Add the following to your Ignition file.
systemd:
  units:
    - name: docker.portainer.service
      enabled: true
      contents: |-
        [Unit]
        Description=Portainer Admin Container
        After=docker.service
        Requires=docker.service network.target network-online.target

        [Service]
        Type=oneshot
        RemainAfterExit=yes
        TimeoutStartSec=0
        ExecStartPre=-/usr/bin/docker stop %n
        ExecStartPre=-/usr/bin/docker rm %n
        ExecStartPre=/usr/bin/docker pull portainer/portainer-ce
        ExecStart=-/usr/bin/mkdir -p /mnt/shared_nfs/portainer_data
        # Privileged mode is required for binding to local socket to work due to SELINUX (https://github.com/portainer/portainer/issues/849)
        ExecStart=/usr/bin/docker run --privileged=true -d -p 9000:9000 --name %n --restart always -v /var/run/docker.sock:/var/run/docker.sock -v /var/portainer_data:/data portainer/portainer-ce
        ExecStop=/usr/bin/docker stop -t 15 %n

        [Install]
        WantedBy=multi-user.target
You can see the full Butane file on GitHub.
Start Over
Because FCOS reads the Ignition file only at install time, you need to reinstall the OS if you change the Ignition file.
Ok, I know the title of this article has the words "7 Easy Steps", but I didn't say how many times you'd repeat each step. I could've told you to do everything all at once, but if something went wrong, it would be difficult to figure out what is wrong. By setting up the server in steps, you make sure you don't move on to the next part without making sure the previous parts work.
This is especially important when you turn on the firewall. Debugging firewalls is hard enough. You can't debug it if you don't even know if ssh or http is working. So before turning on your firewall, make sure everything else is working.
Think of it this way. This will be easy for you by the time you get your server setup. You might even have some of it memorized.
Shutdown your VM by typing poweroff. Go to VirtualBox and right click on your VM and select "Remove". In the confirmation dialog select "Delete all files".
Now go back to Step 2 and repeat. To make it easier, I've condensed the steps below.
Set up VM
- Linux
- Red Hat (64-bit)
- 4096 MB RAM
- Create a virtual hard disk now
- 9 GB Dynamically allocated VDI
VM Settings
- 2 CPU's
- Set up networking
- Start VM
Set IP if you need to
sudo ip addr add 192.168.0.200/24 dev enp0s3
On host type:
butane < 2_portainer.bu > 2_portainer.ign
python3 -m http.server
VM:
curl -O host.example.com:8000/2_portainer.ign
cat example.ign
sudo coreos-installer install /dev/sda --ignition-file example.ign
poweroff
Remove Live CD Start VM
If everything worked right, you wont need to login after you install it. Wait a minute for Portainer to start. Then open up a web browser to http://fcos.example.com:9000/ (change fcos.example.com to your VM IP). Note, your new VM might have a different IP if you have DHCP.
Don't go to Step 6 until you have Portainer working without having to login.
Step 6. Add WordPress
Enter a username and password at the Portainer initialization page and click "Create user". On the next screen, connect Portainer to Docker and click "Connect". Click on the "local" endpoint.

Click on "Stacks" and then click the "Add stack" button. Give it a name.
Open a new webpage to the github.com/docker/awesome-compose repository and copy the contents of the WordPress-MySQL docker-compose.yaml file.
As of today, this is what that file looks like.
version: '3.7'
services:
  db:
    image: mysql:8.0.19
    command: '--default-authentication-plugin=mysql_native_password'
    volumes:
      - db_data:/var/lib/mysql
    restart: always
    environment:
      - MYSQL_ROOT_PASSWORD=somewordpress
      - MYSQL_DATABASE=wordpress
      - MYSQL_USER=wordpress
      - MYSQL_PASSWORD=wordpress
    expose:
      - 3306
      - 33060
  wordpress:
    image: wordpress:latest
    ports:
      - 80:80
    restart: always
    environment:
      - WORDPRESS_DB_HOST=db
      - WORDPRESS_DB_USER=wordpress
      - WORDPRESS_DB_PASSWORD=wordpress
      - WORDPRESS_DB_NAME=wordpress
volumes:
  db_data:
In Portainer, make sure "Web editor" is selected. Paste the text into the web editor. At the bottom click "Deploy the stack". The button text will change to "Deployment in progress". Wait for it to start up. Open up a new webpage to http://fcos.example.com (change fcos.example.com to your VM IP). You should see the following.
Now you are ready to add a firewall. But don't start over yet. You need to Get the Network Interface if you haven't already. So leave this VM running.
Step 7. Add a Firewall
About Docker's Firewall
Firewalls work by creating a list of rules, called chains. When a network packet reaches the computer, the packet is compared to the rules. Depending on the rule, the packet could be accepted or dropped. If that happens no more rules will be examined.
If the packet isn't accepted or dropped, then the next rule will be examined. If no rules accept or drop the packet, then the last rule decides the packets fate. A "default deny" policy will deny all packets that reach the last rule. A "default allow" policy will accept all packets that reach the last rule. Docker uses a "default allow" policy.
Docker is tightly coupled with the system firewall. It creates it's own rules for containers that have higher precedence than other rules. To allow administrators to create rules for containers Docker added the DOCKER-USER chain. You'll be making all of your container rules in DOCKER-USER. Your OS rules, like for ssh, go in the INPUT chain.
If you want to simulate default deny behavior, you have to drop all traffic from the external network interface in the DOCKER-USER chain. This allows the internal network traffic to pass through so that Docker still works. The iptables command to create a rule to drop external network traffic looks like this.
/usr/sbin/iptables -A DOCKER-USER -i enp0s3 -j DROP
This has to be the last rule in DOCKER-USER or else your other rules wont be evaluated.
All of the following rules assume there is only one external network interface and that it is enp0s3. If your server has a different network setup, you're going to have to modify all of these rules to make sure they work with your setup.
nftables vs iptables
Nftables remedies many problems with iptables such as ease of use, scalability, and performance. Nftables has been included in the Linux kernel since 2014. You can read more about moving from iptables to nftables from the nftables wiki.
Unfortunately, Docker is tightly coupled with iptables. And at the time of this writing, I couldn't get nftables to work correctly with Fedora CoreOS. I'm not sure if it didn't work because of my configuration, Docker, or Fedora CoreOS.
So this article will just cover iptables.
Get the Network Interface
Before you can create a firewall you need to know your network interface. This will be different depending on the type of network adapter the VM is configured with. The easiest way to find the interface is to boot the VM and check. Hopefully, you didn't remove your previous VM. If you did, you'll need to create a quick VM so you can get the interface. Make sure it has the same network interface that you plan on using.
Login and type this command to get the interface.
nmcli connection
You should see something like this.
Wired connection 1  df07b92a-4319-3ae7-8ebd-3920b2ac15b3  ethernet  enp0s3
docker0             ac84b147-bab5-489a-8168-883462a9bbed  bridge    docker0
The correct interface for this output is enp0s3. I use enp0s3 in the following examples, but yours may be different. Because the interface may change I try to keep the interface defined as a shell script variable.
Adding iptables to the Butane file
Add the following to your Ignition file in the correct places.
storage:
  files:
    - path: /etc/sysconfig/iptables-post-docker
      mode: 0755
      contents:
        inline: |
          #!/bin/sh

          interface=enp0s3
          admin_net=192.168.0.15

          /usr/sbin/iptables -A INPUT -i lo -j ACCEPT
          /usr/sbin/iptables -A INPUT -m state --state ESTABLISHED,RELATED -j ACCEPT
          /usr/sbin/iptables -A INPUT -p tcp --dport 22 -s $admin_net -j ACCEPT
          /usr/sbin/iptables -P INPUT DROP
          /usr/sbin/iptables -D DOCKER-USER 1
          /usr/sbin/iptables -A DOCKER-USER -p tcp --dport 80 -j RETURN
          /usr/sbin/iptables -A DOCKER-USER -p tcp --dport 443 -j RETURN
          /usr/sbin/iptables -A DOCKER-USER -p tcp --dport 9000 -s $admin_net -j RETURN
          /usr/sbin/iptables -A DOCKER-USER -i $interface -j DROP
systemd:
  units:
    - name: iptables-post-docker.service
      enabled: true
      contents: |
        [Unit]
        Description=Post docker iptables firewall rules
        After=docker.service

        [Service]
        Type=oneshot
        ExecStart=/etc/sysconfig/iptables-post-docker

        [Install]
        WantedBy=basic.target
You can see the full Butane file on GitHub.
Be sure to change the admin_net variable to use the IP's for your network. 192.168.0.15 is my administrator computer.
You can change the firewall after it's been installed by remotely logging in and editing /etc/sysconfig/iptables-post-docker.
However, doing this is what causes configuration drift. To avoid configuration drift, you'll make the change in your Butane file and create a new FCOS VM with the new config and remove the old VM with the old config. If you're using a network storage volume, this isn't such a hard task.
iptables rules
You probably want to change the rules a little so I will explain what the rules do.
These lines open up web access.
/usr/sbin/iptables -A DOCKER-USER -p tcp --dport 80 -j RETURN
/usr/sbin/iptables -A DOCKER-USER -p tcp --dport 443 -j RETURN
If you have any other ports that your containers need opened put them here.
This next line gives the admin computer access to Portainer.
/usr/sbin/iptables -A DOCKER-USER -p tcp --dport 9000 -s 192.168.0.15 -j RETURN
All of the other lines must look exactly like they are and if you change any of them without knowing what you're doing you will likely stop the firewall from working correctly.
Warning!
I noticed that changing ports doesn't work. In the next line I changed Portainer from port 9000 to 9001.
sudo docker run --privileged=true -d -p 8000:8000 -p 9001:9000 --name=portainer --restart=always -v /var/run/docker.sock:/var/run/docker.sock -v portainer_data:/data portainer/portainer-ce
I also changed the firewall.
/usr/sbin/iptables -A DOCKER-USER -p tcp --dport 9001 -s $admin_net -j RETURN
I couldn't get this to work.
Start Over Again
Now that you have your firewall rules, you'll need to start over again. That includes converting your new Butane configuration file, putting the Ignition file on a web server, shutting down your VM, throwing it away, recreating it, starting the VM, downloading the Ignition file, installing, and restarting.
I will be honest. Developing immutable operating systems means you will be repeating this step over and over. Because of this, you need to come up with a way of making this quick and easy. Here's a script that will convert the butane file, create a VirtualBox VM, and set it up. It does not start the VM though.
Edit the first few lines to make sure it works in your environment.
#/bin/sh

vmname="3_iptables"
vm_path=~/"VirtualBox VMs"
iso_path=`ls "$vm_path"/fedora-coreos-*-live.x86_64.iso | tail -n 1`
cd ~/butane_files

if [ ! -e $vmname.bu ]; then
    echo "Edit this script so it changes to the directory with $vmname.bu"
    exit
fi

docker run -i --rm quay.io/coreos/butane:release --strict < $vmname.bu > $vmname.ign

VBoxManage createvm --name $vmname --ostype RedHat_64 --register
VBoxManage storagectl $vmname --name IDE --add ide
VBoxManage storageattach $vmname --storagectl IDE --port 0 --device 0 --type dvddrive --medium "$iso_path"
VBoxManage createmedium --filename "$vm_path/$vmname/$vmname.vdi" --size 9216
VBoxManage storagectl $vmname --name SATA --add SATA --controller IntelAhci
VBoxManage storageattach $vmname --storagectl SATA --port 0 --device 0 --type hdd --medium "$vm_path/$vmname/$vmname.vdi"
VBoxManage modifyvm $vmname --nic1 bridged --bridgeadapter1 en0
VBoxManage modifyvm $vmname --memory 4096 --vram 16
VBoxManage modifyvm $vmname --cpus 2
VBoxManage modifyvm $vmname --audio none
VBoxManage modifyvm $vmname --usb off
VBoxManage modifyvm $vmname --usbehci off
VBoxManage modifyvm $vmname --usbxhci off

echo "Next steps:"
echo "Type 'python3 -m http.server'"
echo "Power on the VM"
echo "In VM type the following:"
echo "    curl -O host.example.com:8000/$vmname.ign"
echo "    cat $vmname.ign"
echo "    sudo coreos-installer install /dev/sda --ignition-file $vmname.ign"
echo "    sudo poweroff"
echo "Remove the live installer iso then restart the VM"
This script is also on GitHub.
I could've given this script to you earlier, but the script isn't the greatest, and you'll likely need to fiddle with it to get it to work for you. So it's best to tackle one hurdle at a time.
For example, you'll probably need to change the next line so it works in your network environment.
VBoxManage modifyvm $vmname --nic1 bridged --bridgeadapter1 en1
If you can't get the script to work, then just create the VM manually like you have been and start it up.
Testing the Firewalls
First, test the obvious. Make sure you can ssh in to your VM and access the Portainer url from your administrative computer. Then make sure you can't access those from a different IP. If this works, then move to the next round of tests.
Add WordPress. Now check to make sure you can access WordPress from any computer.
Lastly, if you want to be thorough, open a port that should be closed, like 8888, and then make sure you can't access it from any IP. You will have to ssh in and run the following code on the command line.
sudo docker run -p 8888:8888 -v $PWD:/data -it --rm python
Then type these commands
import os
os.chdir("/data")
from http.server import HTTPServer, SimpleHTTPRequestHandler
HTTPServer(('', 8888), SimpleHTTPRequestHandler).serve_forever()
If you can't access port 8888 from any IP, that's great, it works.
However, make sure it's working. Open a new window and ssh in and type this to make sure the web server is running on port 8888.
curl localhost:8888
You should see lots of html.
To exit the docker container type control-c, then control-d.
Troubleshooting
If you find that the rules don't work, instead of recreating the VM over again and again, it's best to ssh in and change the firewall rules in the virtual machine. You'll need to use vi to edit those rules. If you don't know how to use vi, do a web search for "vi tutorial".
vi /etc/sysconfig/iptables-post-docker
After changing the rules, you can either reboot the VM, or you can stop docker, restart iptables, then start docker.
sudo reboot
Or
systemctl stop docker
systemctl restart iptables
systemctl start docker
You have to do this because docker modifies the firewall rules when it starts up and if you restart iptables without stopping docker first, you'll just have a mess.
When you have the firewall rules that you want, modify your Butane and other files on your host computer and start over yet again. You should never change the configuration on the VM and then leave it running in production. This is how it's been done in the past, but the whole point of having an immutable and ephemeral operating system is to have all of your configuration saved outside of the server's file system.
You should never make a last minute change without testing it thoroughly and completely. Last minute untested changes will always lead to a mistake, maybe not this time, but eventually it will happen.
Last steps
After you have made all the changes and verified they will work, then you are ready to move on from VirtualBox and try to provision your Fedora CoreOS server on bare metal, in your virtual environment, or the cloud. Read the FCOS documentation to find a provisioning method of your choice and get familiar with all of the features of FCOS.
Other things you will want to do include enable ssl for Portainer and WordPress, set the Fedora CoreOS update policy, and set up external storage.
Final words
Things are changing quickly. I had to modify this article several times while writing it because things changed while I was writing it.
FCOS is currently migrating their firewall backend from iptables to nftables. When this happens, the firewall rules should still work but there is a chance something could break, especially if you have a complex firewall. You can tell when the change has occurred when running iptables -V no longer displays "legacy".
iptables -V
iptables v1.8.5 (legacy)
Hopefully the FCOS documentation will soon include official firewall documentation. And hopefully the problems with nftables will be fixed. And I look forward to Portainer working with podman.
I hope you were able to follow along and get this working for you. I am excited about the Fedora CoreOS and containers and I hope to pass that excitement on to others.
Good luck and happy sailing.
Request a Demo of Portainer Business
Let us introduce you to a world of fast and easy app deployment, governance, and management in Docker and Kubernetes. Contact our sales team to discuss how Portainer Business helps to make teams more accurate and efficient in a business environment.

COMMENTS